Manage Tracking Permissions and Outages
Introduction
HyperTrack powers location-based logistics using app location and activity with permissions from app users. To protect user privacy, it is imperative that location be used during working hours. Ensuring that location is used only during business hours results in better compliance from app users and improves tracking rate for the mobile fleet.
Tracking rate is the percentage of duration tracked relative to the time that the business intended to track. In cases of outages in tracking, HyperTrack provides granular and actionable information about outage reasons.
Outage is an issue that prevents HyperTrack from tracking the device. Outages can be caused by various reasons, such as user actions or device state.
Outage Category Types
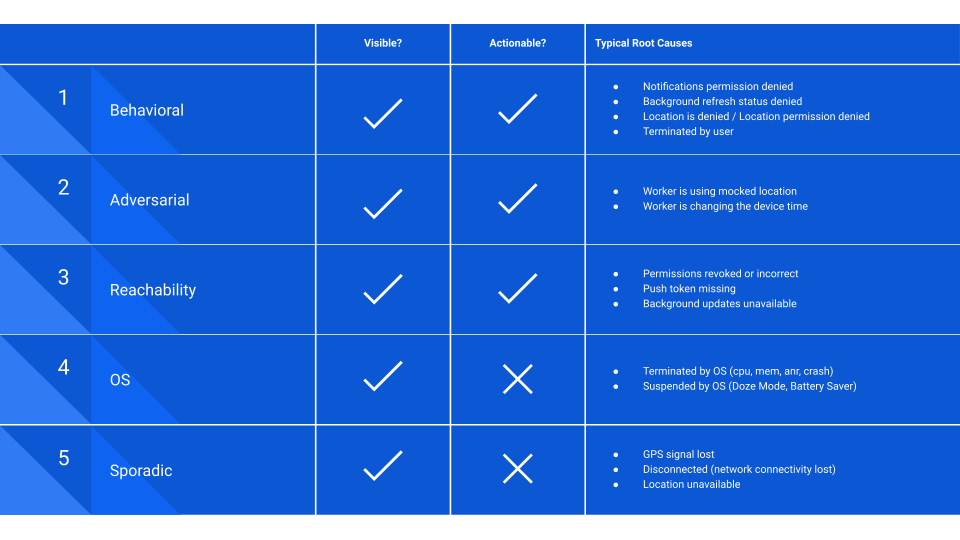
HyperTrack proactively identifies reasons for outage tracking and offers APIs to enhance worker tracking rates. The reasons fall into several categories:
Behavioural: This category covers outages resulting from explicit user actions, such as turning off location sharing permissions on the device or at the app level, and deleting or uninstalling the app that contains the HyperTrack SDK.
Adversarial: This category includes outages caused by workers attempting to defraud the system, for example, by sending location data from places where they are not physically present. HyperTrack also identifies instances where workers manipulate device time to falsely inflate hours worked, aiming for higher pay without performing the work.
Operating System (OS): This category captures outages arising from mobile operating system issues, including app termination due to low memory, system reboots, updates, or excessive resource usage.
Sporadic: This category pertains to tracking outages related to environmental conditions, such as a low battery, device-specific battery saver features interfering with tracking reliability, or unavailable GPS signals.
Reachability: Situations where the HyperTrack SDK, embedded in an app, relies on server connectivity to initiate tracking. This category describes instances when the HyperTrack platform cannot communicate with the device due to temporary connectivity issues or problems like a missing or misconfigured push notification token.
Worker permissions and outages
HyperTrack requires location permissions to generate accurate ground truth data from app user movement. When permissions are not granted, HyperTrack SDK provides reasons why these permissions are not granted and instructs the app developer with steps required to achieve highest tracking rate possible. In addition to location permissions potentially missing, HyperTrack SDK also detects and reports outages related to user actions, fraud, mobile operating system context, as well as environmental factors, such as network conditions.
List of outage codes
You can check the full list of outages and descriptions for them here
Manage permissions
iOS and Android OS require applications to request permissions to track location of the user.
Request permissions in the app
Since tracking can only be started if permissions are granted, your app needs to request them in advance. Make sure to follow OS guidelines while building permissions request screen.
Here you can check the list of permissions that is required for each platform: iOS / Android.
For Android you also need to apply for a review for Background Location permission.
You can check the list of permissions that are not granted at the moment using Errors API: iOS / Android.
We recommend to check it every time the app starts or goes to the foreground because the user can revoke or grant the permissions anytime.
If you want to know in detail how does permissions system work on iOS and Android, you can check the following articles in HyperTrack blog:
- Impact of iOS 13 and iOS 14 location permissions on background location access
- Evolution of location access on Android
Whitelisting
Many manufacturers of Android devices include battery saver services to their device firmware. It can also interrupt the tracking so you need to add your app to the whitelist of all battery saving services.
See details in the Whitelisting section.
Webhooks
You can subscribe to webhook notifications about your app users' device status. Check the Webhooks doc to integrate and receive device status updates in real-time.
Embed Views
Workers API provides you a set of embeddable views to create a customizable realtime tracking experience that includes showing the outages. Check the Embed Views guide for more details.