Track Orders using Geotags
Introduction
Order geotags help you track the geolocation of work done by workers on a timeline. As workers on the move perform actions in the app, the time and location of those actions get geotagged along with associated metadata if present.
Order geotags provide the ability to get true distance and duration travelled by your workers on ground. Each order geotag is enriched to provide the distance and duration from the previous order geotag or the start of your worker's shift. This provides a way to aggregate these metrics across the worker or an order.
Order geotags are also useful to track deviations from expected locations. When generating an order geotag, the expected location can also be provided to compute the deviation and help you take action in real-time through application workflows. If we consider the above example, for the arrived and completed geotags, you can provide the customer location as the expected location to get the deviation information. This helps your ops team track that things are happening at the right time and place as expected, and proactively improve when they don’t.
When fulfilling an order, each order geotag can be associated with an order_handle which is a unique identifier of an order in your business. This helps you collect all the geotags for an order which can be retrieved using API or viewed through the dashboard. The order_status is a property that can be used to label the different segments in the order fulfillment process.
Let's consider an example. James is the worker in your fleet who needs to deliver a package to your customer. When the order is assigned to James, he can generate a geotag from his app with a unique order_handle (e.g first-order), and a custom order_status as assigned. When James arrives at the customer location, he could generate another geotag with the same order_handle and the order_status as arrived. Finally, once the order fulfillment is complete, he can generate another geotag with the order_status as completed. Using the APIs and dashboard views you can look at this order with its corresponding geotags. If you want to look at the segments in the order, then you could use the order_status to do this.
Create Order Geotags
Order geotags allow you to add business critical context to the timeline of your order.
We currently support the following geotags:
clock_into indicate that work/shift is started.clock_outto indicate that work/shift has finished.custom(string)to indicate custom status update.
To add geotags to order timeline you have to call the addGeotag(order_handle, order_status, metadata) SDK method:
The metadata payload must follow this structure:
{
  "order_handle" : "your_order_handle",
  "order_status" : clock_in | clock_out | custom("your_status"),
  "metadata" : JSON
}
Check details for Clock-in/out Tagging.
Additionally you can define custom(string) order statuses for your specific needs. This will allow you to further validate where the work is happening and whether or not it's happening at the right time and place.
🚧 Order geotags are created in your worker app through the HyperTrack SDK.
📘 If your worker's device is temporarily disconnected due to a network loss, order geotags generated by your workers will be captured offline and sent to HyperTrack once connection is restored.
Metadata payload structure
Order geotag metadata payload is a JSON object that enriches the geotag with relevant information.
In our example, if the nurse Jane arrives at the customer location, the metadata payload for an order geotag may look like the one below and submitted in addGeotag together with order_handle and order_status.
{
  "nurse_name": "Jane Doe",
  "facility": "Gotham city hospital"
}
When you generate an order geotag in your app, HyperTrack will process your geotag for location and provide you with accurate distance and duration metrics between the previous order geotag (or from the start of your worker's shift) to this geotag.
Examples
The examples below show the sample code with the payload for the arrived geotag that Jane's app would send:
// create new geotag payload
Map<String,Object> payload = new HashMap<>();
// add details from the example above
payload.put("nurse_name": "Jane Doe");
payload.put("facility": "Gotham city hospital");
HyperTrack.addGeotag(order_handle, order_status, payload);
// create new geotag payload
Map<String,Object> payload = new HashMap<>();
// add details from the example above
payload.put("item": "Office chair");
payload.put("quantity": 1);
payload.put("customer_name": "John Clive");
sdkInstance.addGeotag(order_handle, order_status, payload);
if let custom_event_marker = HyperTrack.Metadata(rawValue: [
  "item": "Office chair",
  "quantity": 1,
  "customer_name": "John Clive"]) {
  hyperTrack.addGeotag(order_handle, order_status, custom_event_marker)
} else {
  // custom_event_marker can't be represented in JSON
}
Using expected location for deviations
Optionally, you can specify an expected location longitude and latitude for a geotag.
This will allow HyperTrack to provide the deviation between actual and expected locations which you can use to measure address accuracy and worker behavior.
This computed deviation information will be available in the API, the Ops dashboard and the webhooks.
For example, if you want to know if the nurse Jane arrived at the customer location, you could use a payload similar to the one below:
// create new geotag payload
Map<String,Object> payload = new HashMap<>();
// add event details from the example above
payload.put("nurse_name": "Jane Doe");
payload.put("facility": "Gotham city hospital");
Location expectedLocation = new Location("any");
expectedLocation.setLatitude(35.0476912);
expectedLocation.setLongitude(-90.0260493);
HyperTrack.addGeotag(order_handle, order_status, payload, expectedLocation);
// create new geotag metadata payload
Map<String,Object> payload = new HashMap<>();
// add event details from the example above
payload.put("item": "Office chair");
payload.put("quantity": 1);
payload.put("customer_name": "John Clive");
val expectedLocation = Location("any")
expectedLocation.longitude = -90.0260493
expectedLocation.latitude = 35.0476912
sdkInstance.addGeotag(order_handle, order_status, payload, expectedLocation);
Using Geotags to track work
Basic Visibility
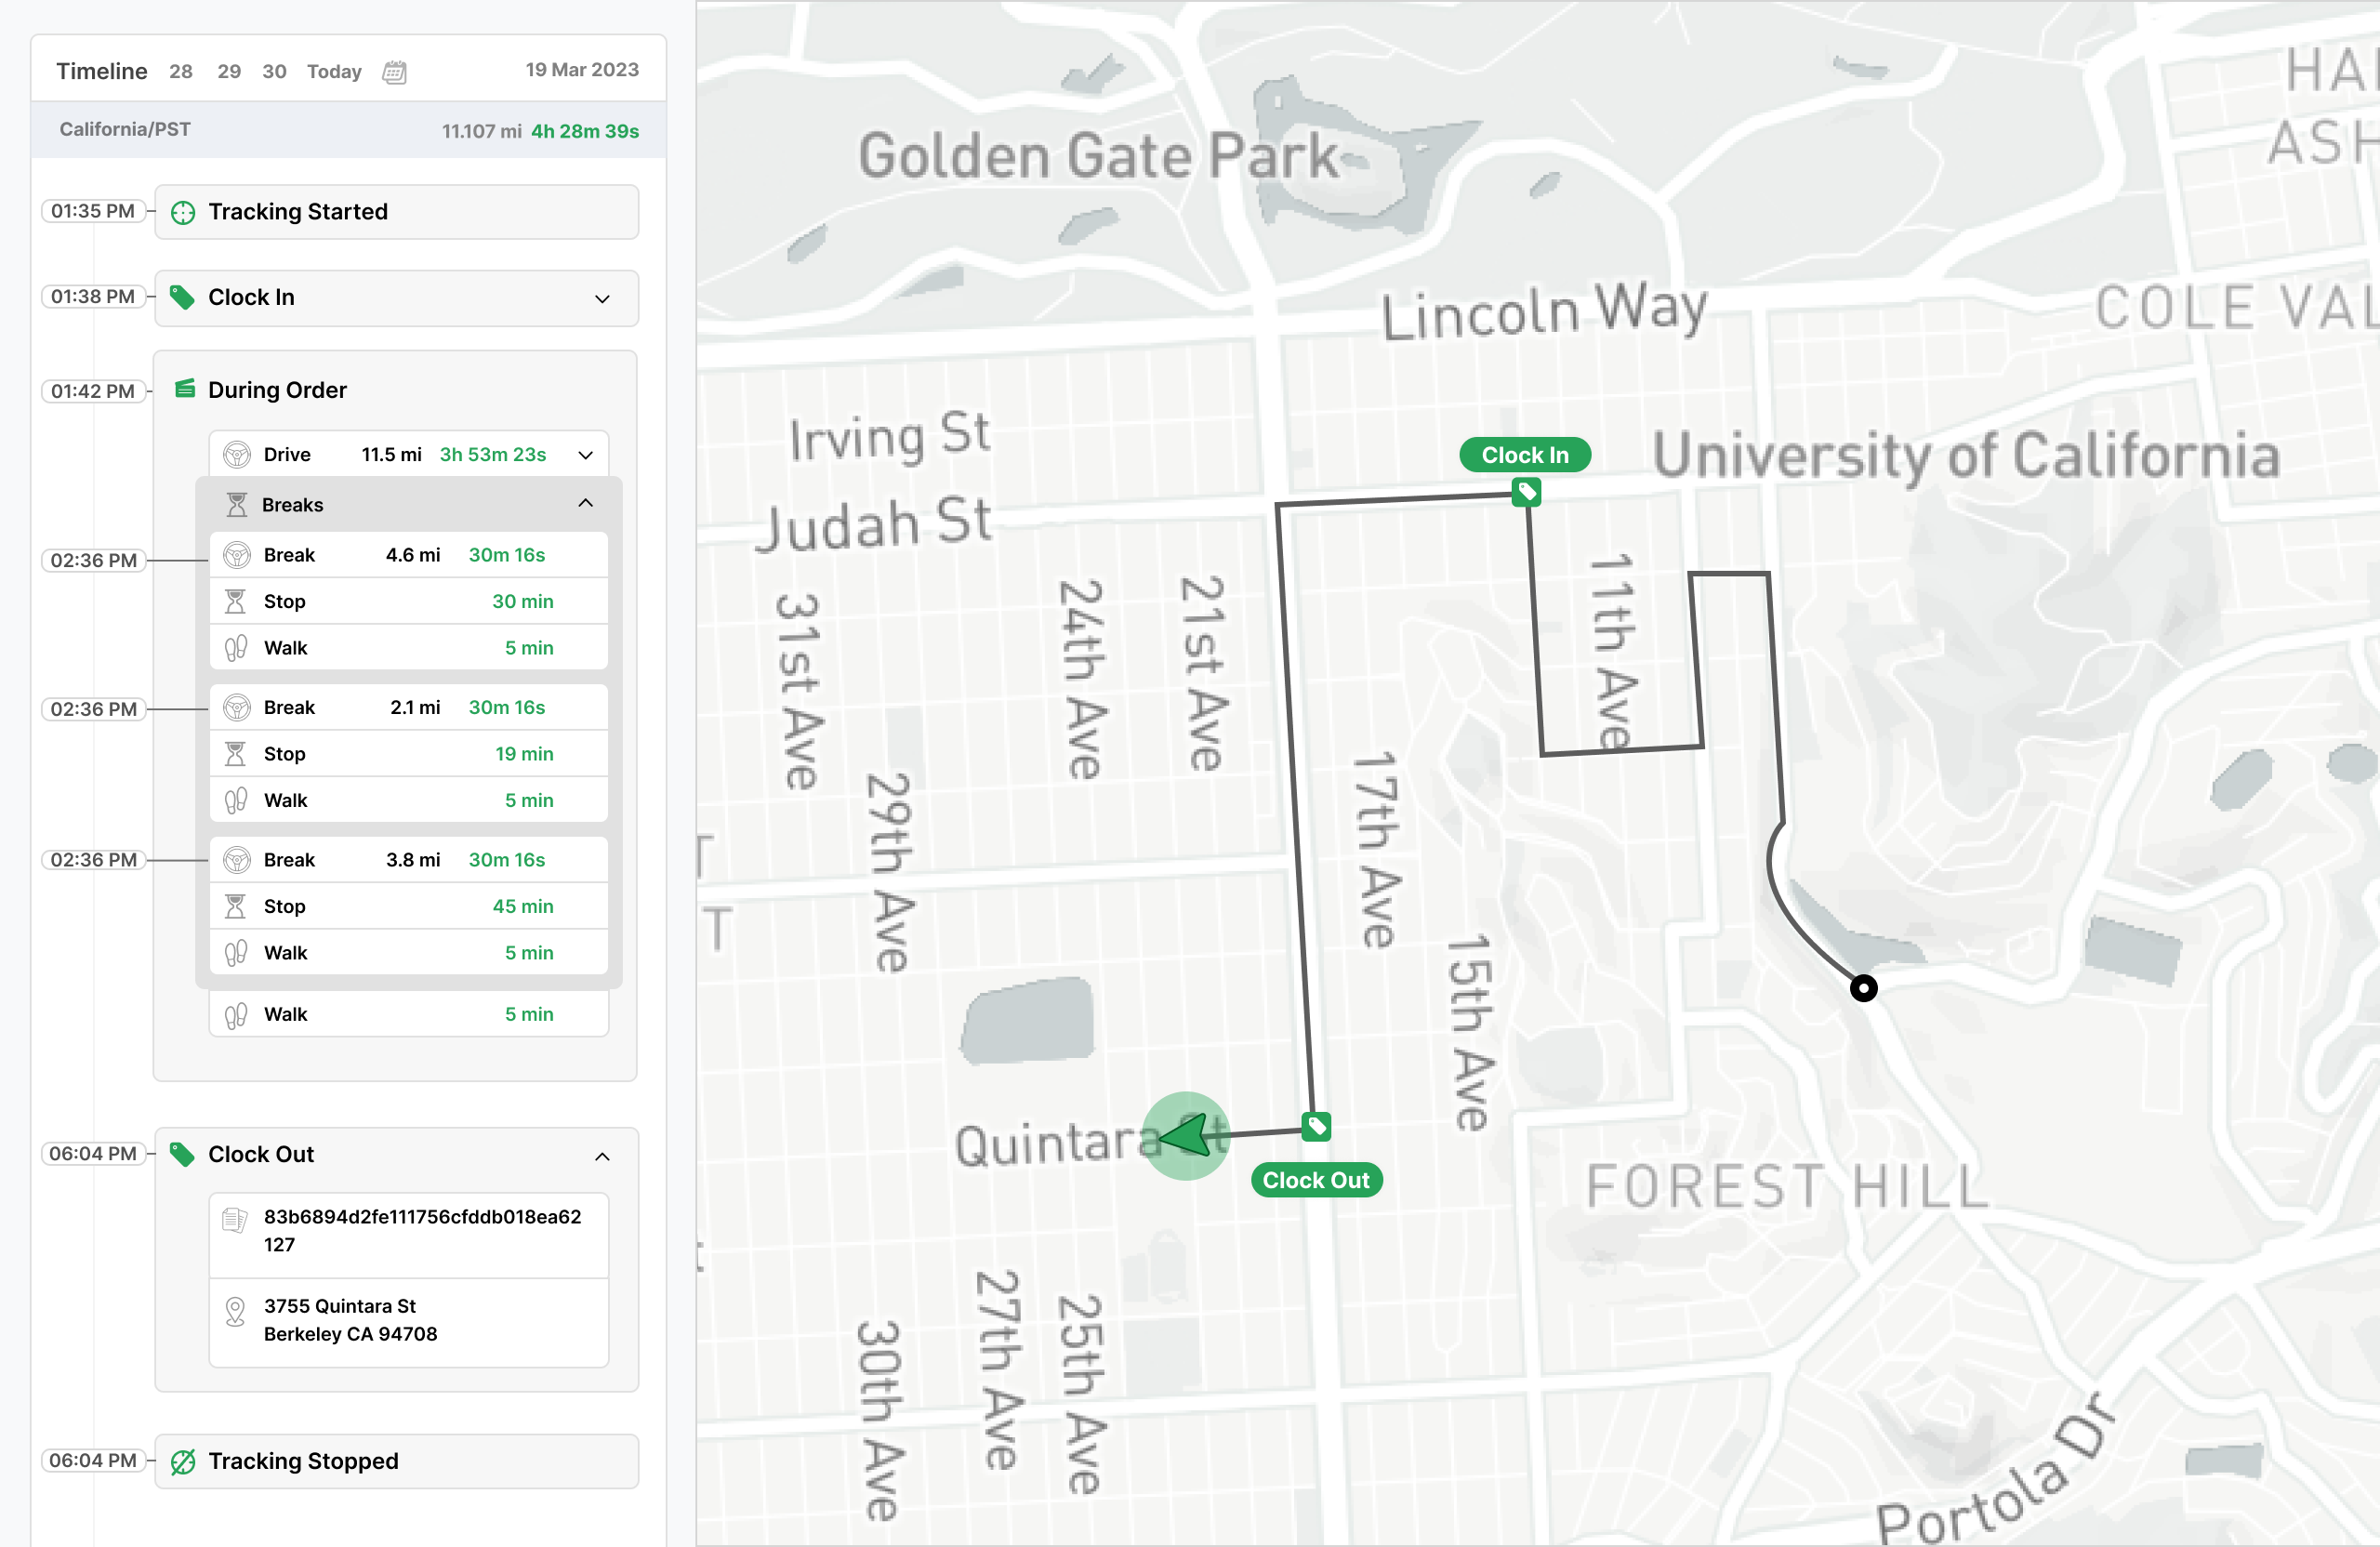
The simplest way to use Geotags is to create a Geotag for every work related action taken in your worker app. This will let you see all the actions your worker takes in a timeline on a map.
For example if your workforce starts their workday by clicking a clock-in button in the app and ends their workday clicking a clock-out button in the app then you can create start Tracking when clock-in is done and create Geotags for each of the actions to see the entire timeline between clock-in and clock-out on a map.
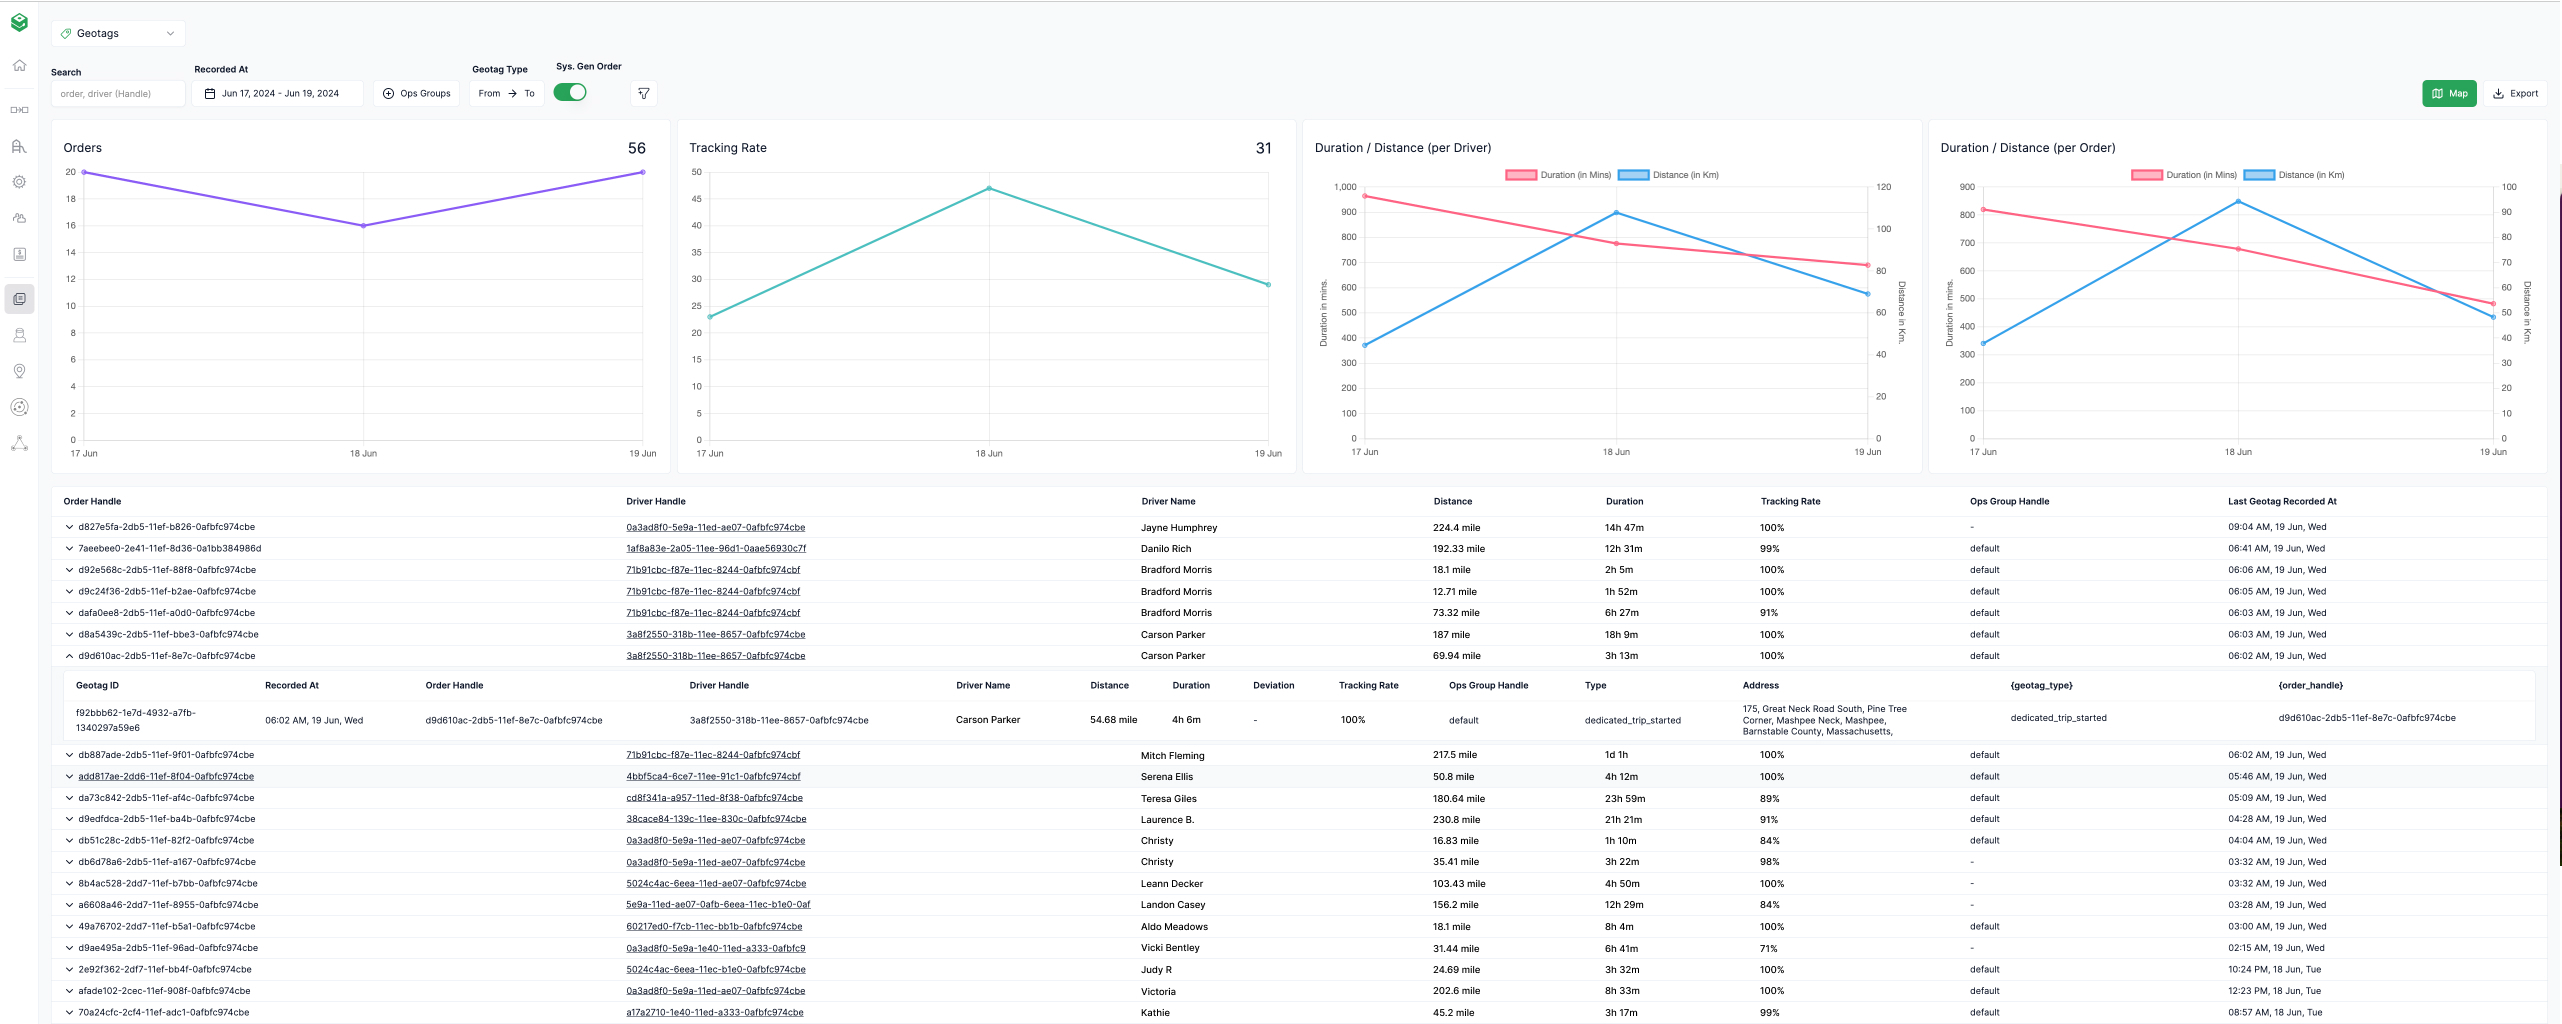
The HyperTrack Geotags ops view will display all the created Geotags as shown in the screenshot below where each Geotag has the worker name, distance travelled, duration and other important information about the work completed.
Each order geotag can be optionally associated with an order_handle which is a unique identifier of an order in your business. This helps you collect all the geotags for an order which can be retrieved using API or viewed through the dashboard. The order_status is a property that can be used to label the different segments in the order fulfillment process.
Let's consider an example. James is the worker in your fleet who needs to deliver a package to your customer. When the order is assigned to James, he can generate a geotag from his app with a unique order_handle (e.g first-order), and a custom order_status as assigned. When James arrives at the customer location, he could generate another geotag with the same order_handle and the order_status as arrived. Finally, once the order fulfillment is complete, he can generate another geotag with the order_status as completed. Using the APIs and dashboard views you can look at this order with its corresponding geotags. If you want to look at the segments in the order, then you could use the order_status to do this.
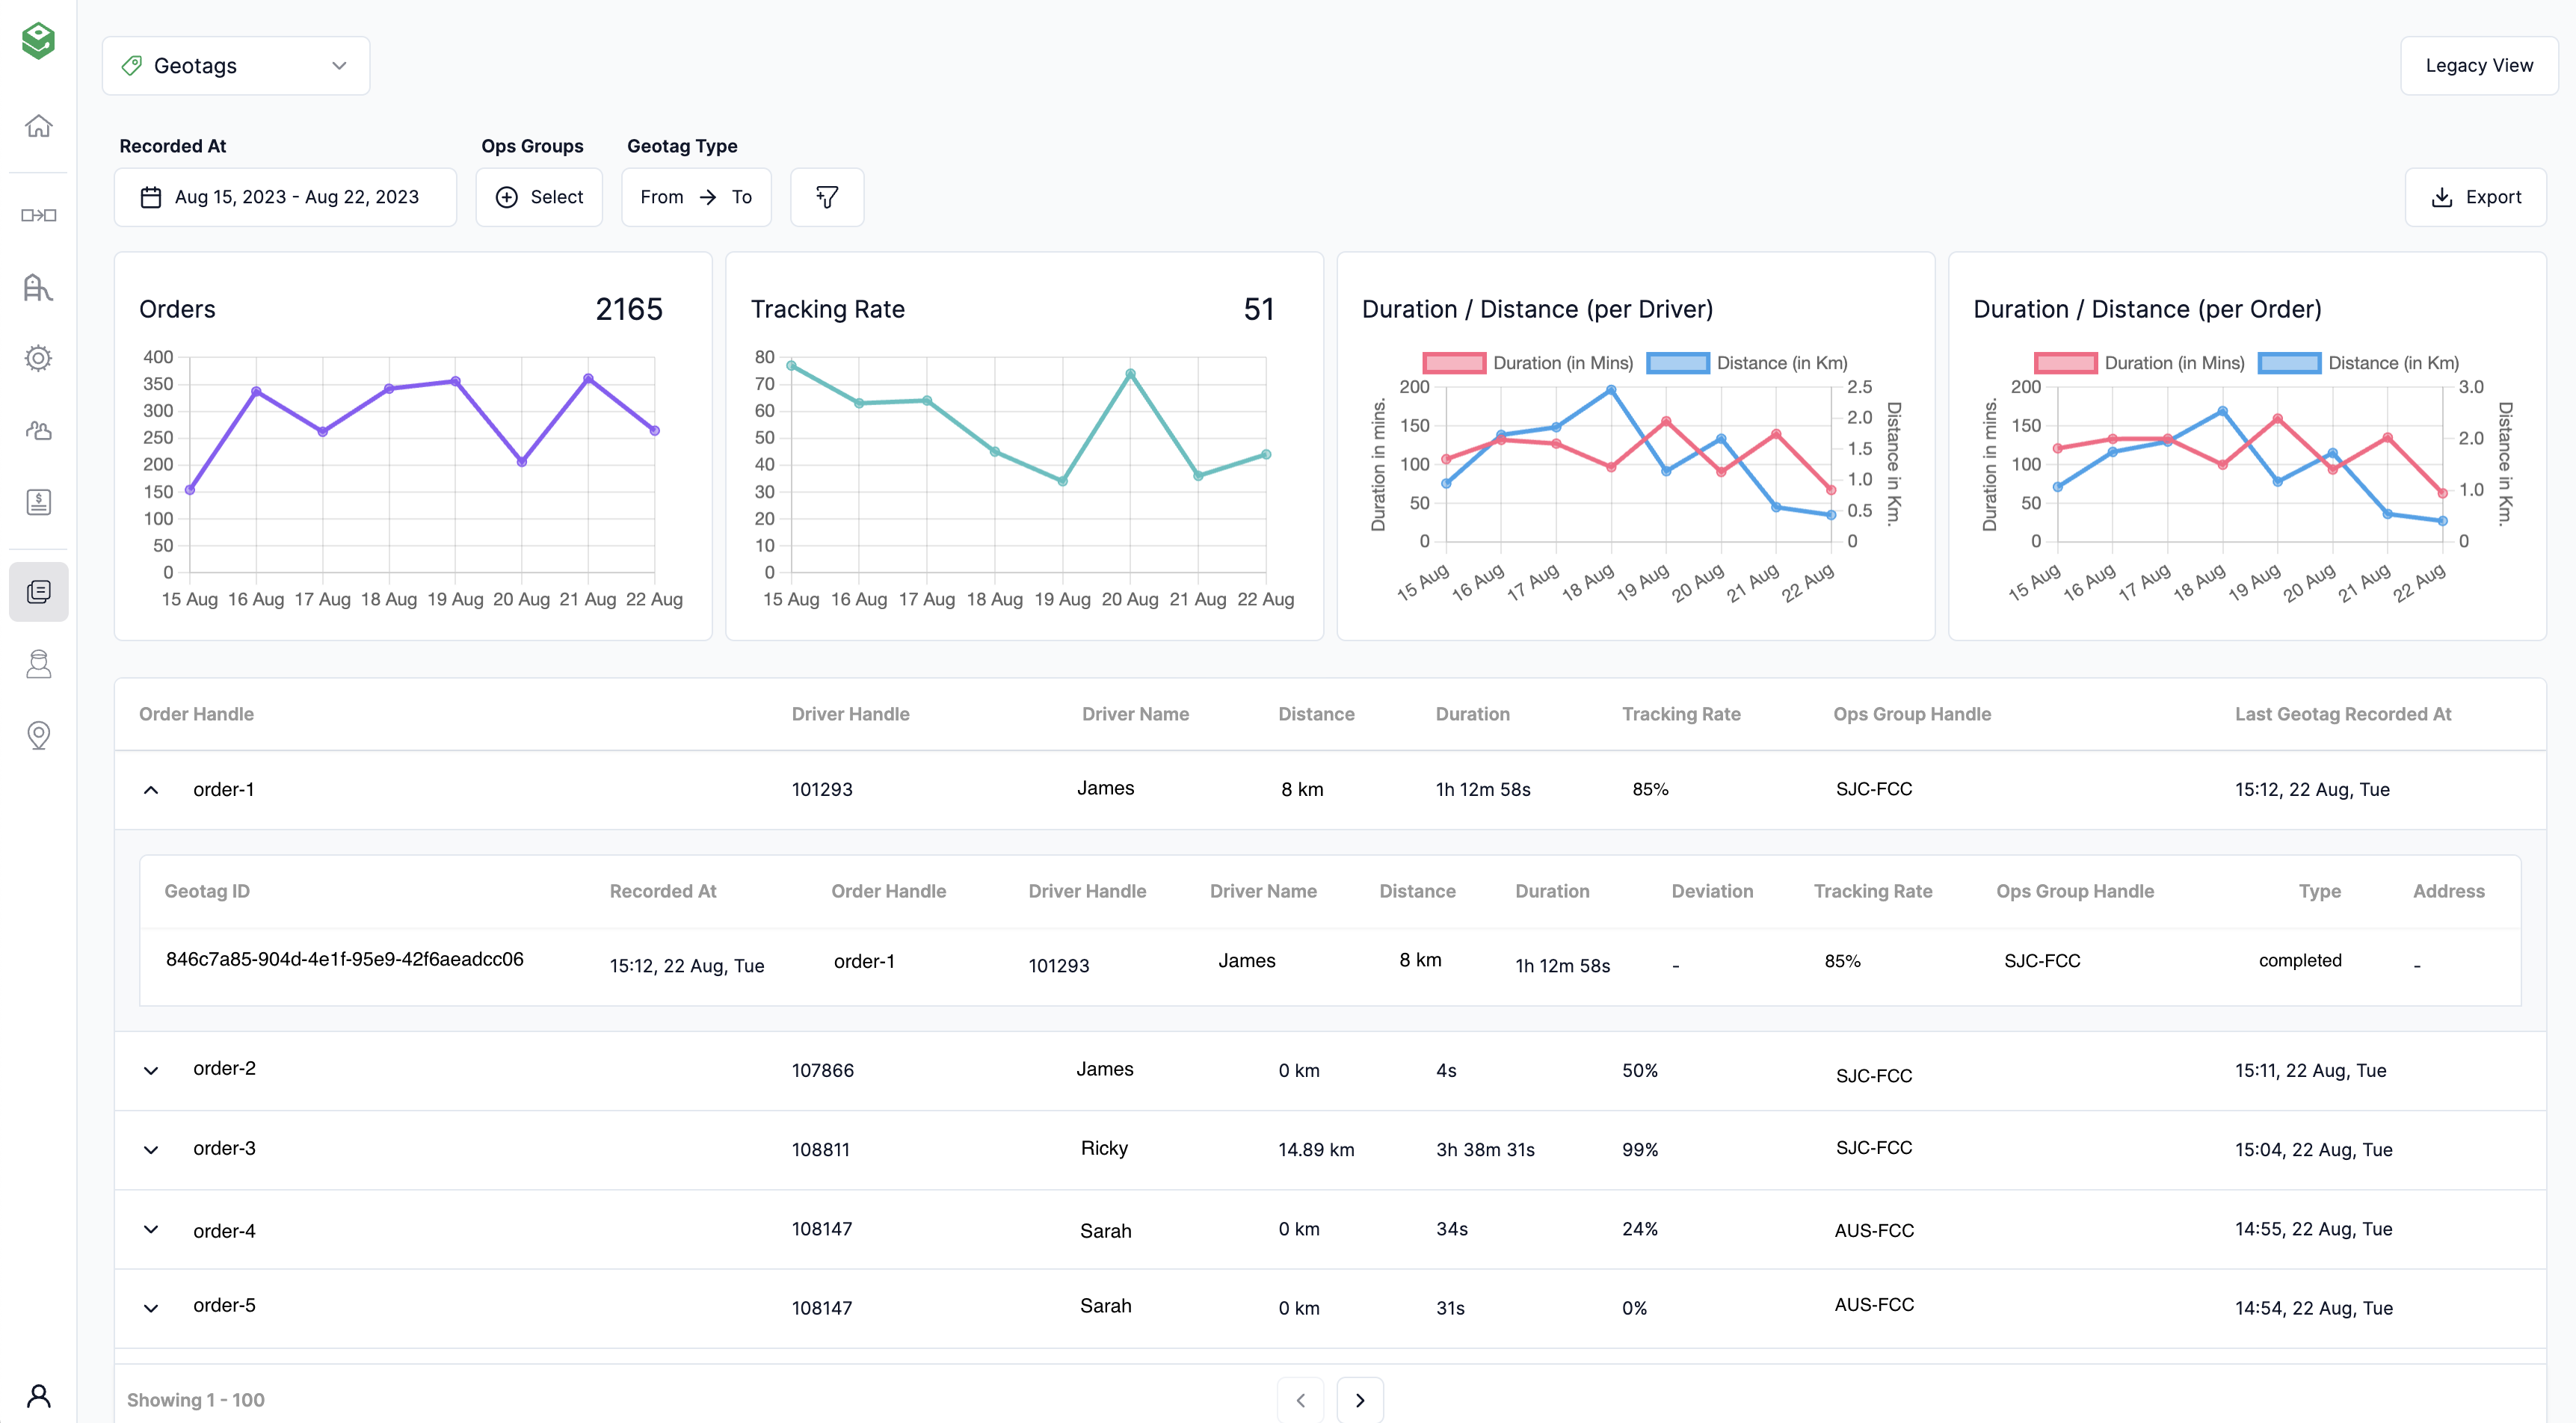
When you send an order_handle for a Geotag, the HyperTrack ops view displays will cluster the Geotags with a common order_handle in the UI as shown in the screenshot below.
This view gives your Ops teams a rich experience with geotags grouped and collapsed into the individual orders. Each row contains all information about an order. The charts in the view provide counts and aggregates over the selected timerange to visualize fulfillment progress to help Ops teams ensure that work progressed as expected. The filters provide the ability to slice information based on a time range and the ops group.
This view is embeddable and can be integrated directly into your Ops dashboard.
On expanding the order, you can dive deeper into the metrics specific to each geotag that was part of the order and replay the worker's activity leading up to the geotag.
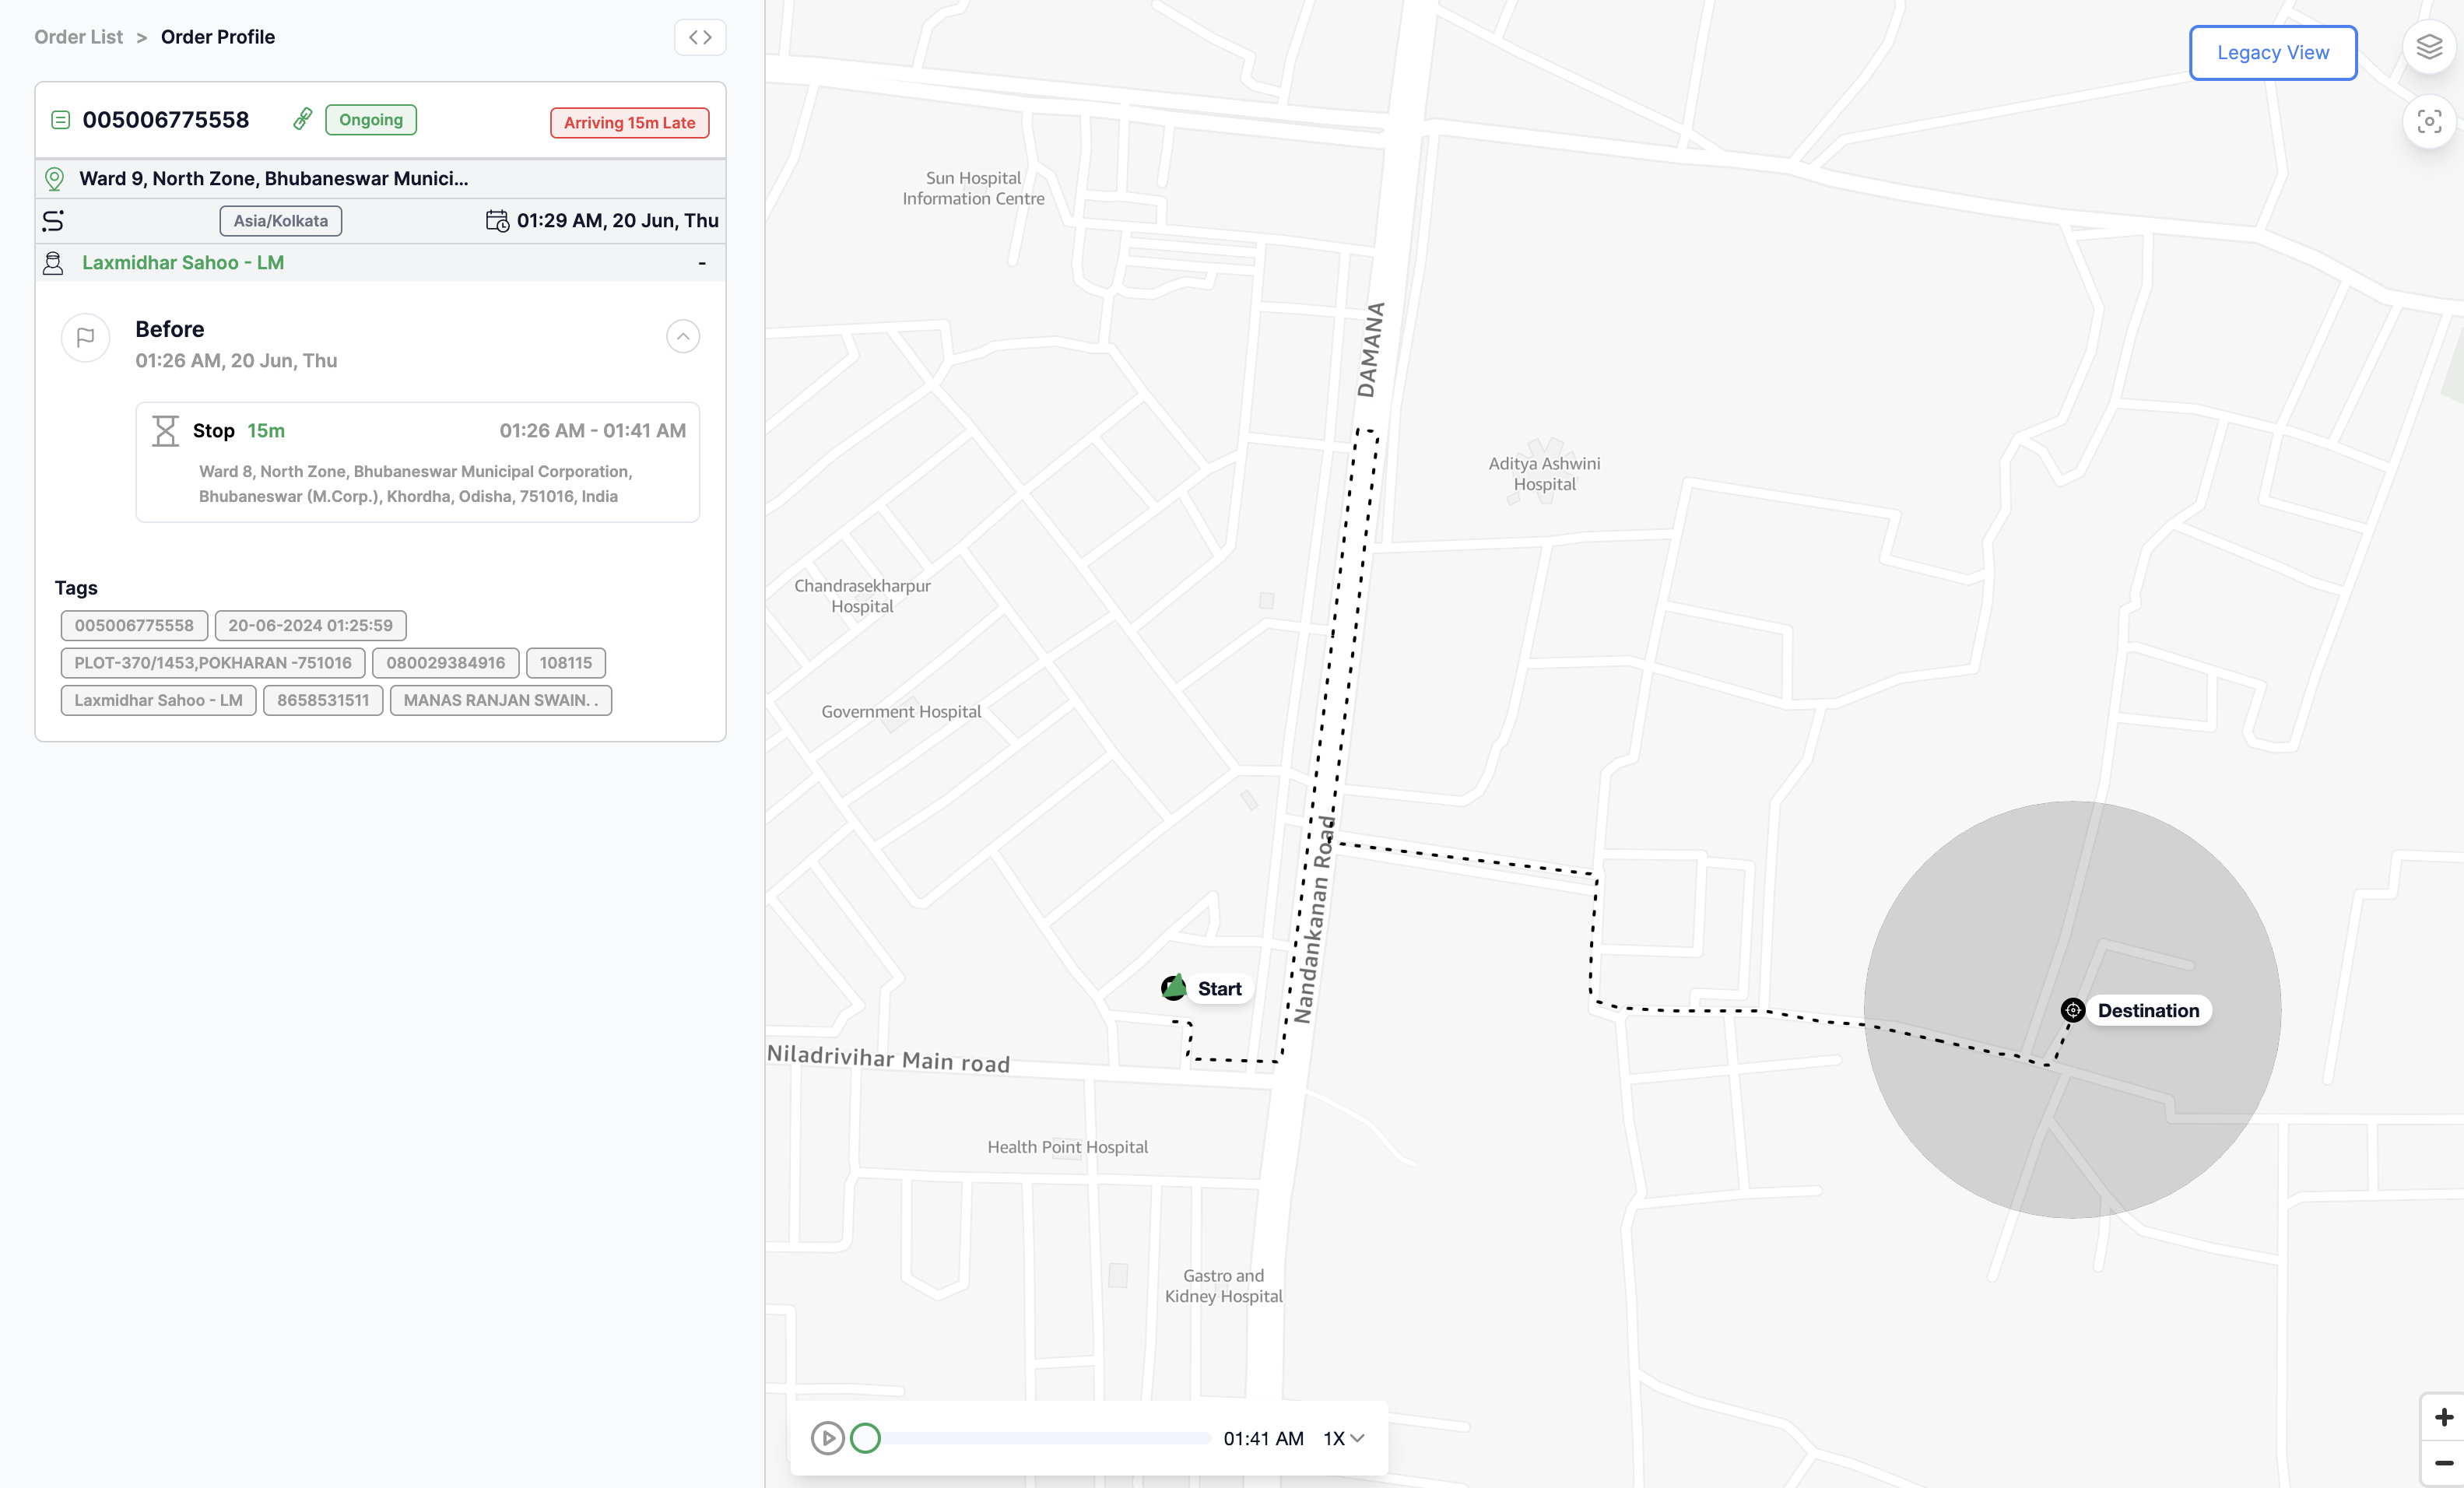
A geotag can be attached to a Proof-of-Work order by populating the order_handle metadata field, this allows for attaching custom annotations to an order timeline and overlay events onto a timeline.
Webhooks
If your app business workflow requires real-time integration with the driver actions on the field, you may use HyperTrack webhooks feature to get information as soon as the driver for instance generates a geotag in an order.
Please review an example payload shown below.
The webhook payload provides the data sent when the driver generated the geotag from the app. The order_handle and order_status help identify the order the geotag belongs to and segment it identifies. In addition, the location, distance in meters, duration in seconds, start_location from the previous geotag event for which distance and duration is generated, and the recorded_at timestamp are provided.
{
  "created_at": "2023-08-01T13:52:07Z",
  "recorded_at": "2023-08-01T13:52:08Z",
  "data": {
    "metadata": {
      "nurse_name": "Jane Doe",
			"facility": "Gotham city hospital"
    },
    "order_handle": "order-1",
    "order_status": "arrived",
    "distance": 238,
    "duration": 63,
    "driver_handle": "Jane",
    "location": {
      "type": "Point",
      "coordinates": [
              -6.2755,
              57.6398983
      ]
    },
  },
  "type": "geotag",
  "version": "3.0.0"
}