
Track Orders using Geofences
Introduction
Geofenced visits automate key workflows like productivity tracking, attendance, timesheets, customer feedback, visit notes, behavior insights, worker safety, route efficiency, and more.
HyperTrack Geofences are configurable zones that measure how time is spent by workers at key locations — and in transit to those locations. This enables teams to answer important questions around productivity, such as:
“Was time spent at a site aligned with expected outcomes?”
With Geofences Cloud, you can automatically track worker visits to places of interest — such as offices, partner locations, merchant sites, branches, field assets, or rest stops.
• Set geofences for all workers, specific teams, or individual users
• Detect arrivals, exits, and time spent with high accuracy
• Capture visit context, including route taken and idle time en route
All visit data is available in real-time via webhooks, visualized in map views, and exportable for reporting and analysis.
Follow these steps to get started with your automatic visit detection.
1. Create Places
Places can be created from the dashboard using the Places Ops View or by posting a request using the Places API.
Places can be set as a geoJSON point location with geofence radius, or as a polygon with geofence coordinates.
Automatic Geofence Visit DetectionFor the Geofence Visit detection, please set the detect_visits flag to True.
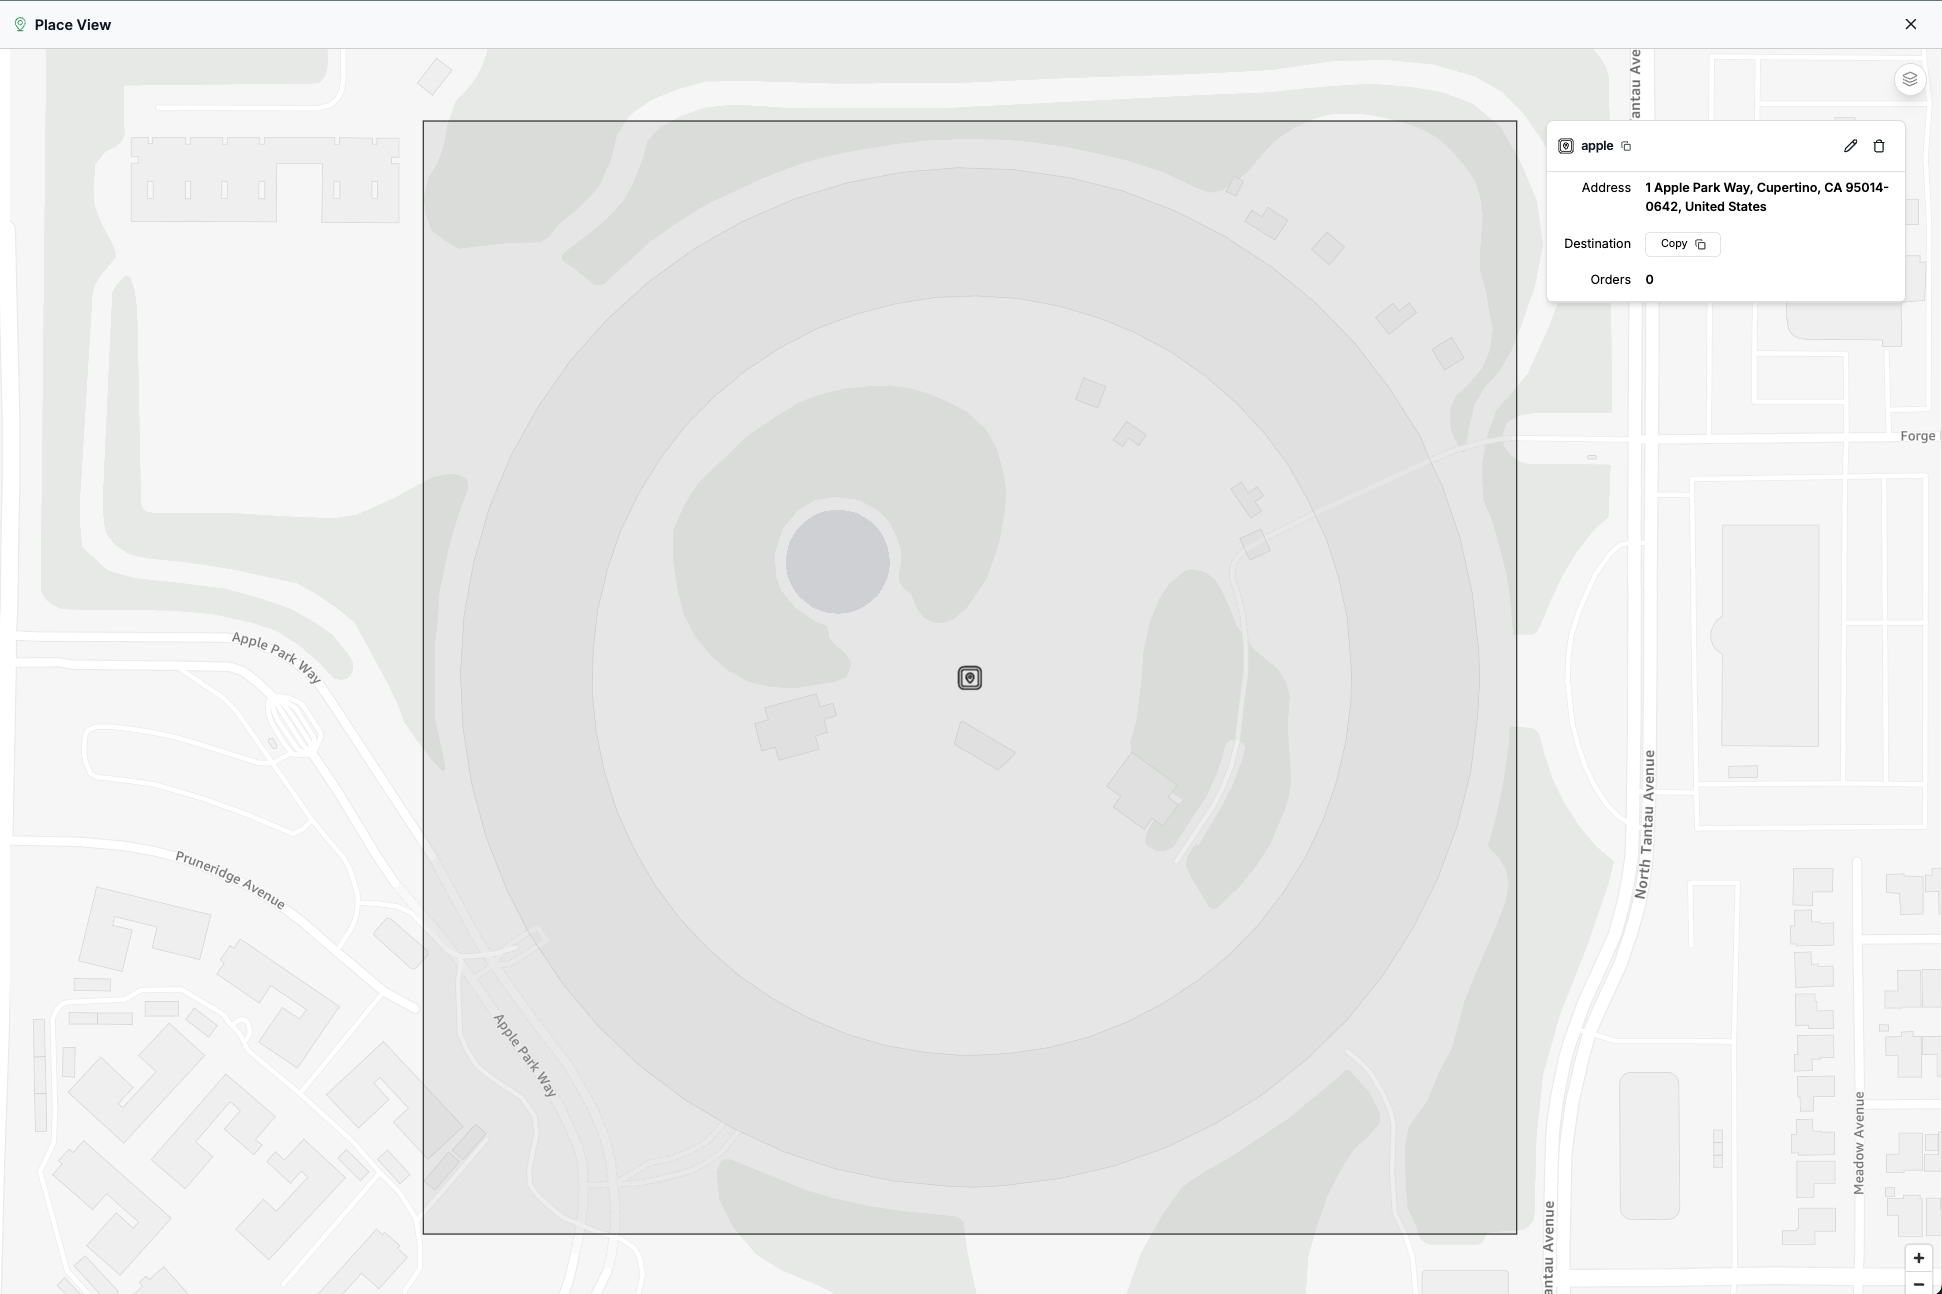
Places Ops View
The Places Ops View lets you manage all your places.
Places API
The Places API follows geojson format for geometries. GeoJSON.io has a useful tool to draw polygons.
To create places, use the Places POST API as shown in the examples below.
For all workers
Set geofences for all workers when you expect any workers in the account to visit from a fixed set of places like offices or warehouses. Visits involve the worker having entered the geofence and optionally exited the geofence. As the number of workers get larger, in hundreds or more, it is advisable to create geofences by groups to avoid generating noisy data.
In the payload below, you are creating a place of Point type for all workers under your account. Your account is automatically identified through your AccountId credential supplied in the API call.
{
  "place_handle": "Apple",
  "geometry": {
    "coordinates": [
      -122.0151944, 37.3346658
    ],
    "type": "Point"
  },
  "radius": 100,
  "address": "1 Apple Park Way, Cupertino, California 95014",
  "detect_visits": true,
}
For groups of workers
To detect visits at a place for groups of workers, you must first set worker profiles using worker profiles and then use it as a filter to apply the place visit detection to that group of workers.
In the payload below, you are creating a place withPoint type, both accessible by workers that have the "foreman" as "Bruce". Your account is automatically identified through your AccountId credential supplied in the API call.
{
  "place_handle": "Apple",
  "geometry": {
    "coordinates": [
      -122.0151944, 37.3346658
    ],
    "type": "Point"
  },
  "radius": 100,
  "address": "1 Apple Park Way, Cupertino, California 95014",
  "detect_visits": true,
  "visit_detection_config": {
  	"metadata":{"foreman":"Bruce"}
  }
}
For specific workers
Set worker-specified geofences for places like home, work location assigned to a worker, or any other place of individual interest. This may be as geofence radius or geofence coordinates. This helps understand when workers leave or re-enter these places during work hours, and power automations that use this information.
In the payload below, you will notice the worker_handle field set to [email protected] which will result in visit detected only for this specific worker.
{
  "place_handle": "Apple",
  "geometry": {
    "coordinates": [
      -122.0151944, 37.3346658
    ],
    "type": "Point"
  },
  "radius": 100,
  "address": "1 Apple Park Way, Cupertino, California 95014",
  "detect_visits": true,
  "visit_detection_config": {
  	"worker_handle":"[email protected]"
  }
}
You can retrieve the Place created using the GET Places by Handle API or searching for the Place in the Places Ops View.
2. Set up Workers
Workers are automatically created and linked to their mobile device when using either the HyperTrack Visits App or when the SDK is integrated into your existing app.
Refer to this guide if you want to use the off-the shelf Visits App from the Play Store or App Store.
Refer to this guide if you want to integrate the HyperTrack SDK into your existing mobile application.
Once the Workers install/update the app, they will appear in the Worker Ops View.
3. Start/Stop tracking Workers
Tracking visits requires that you track the worker's device using the Workers API. To protect worker privacy, and maximize tracking rate, it is important to be mindful about when you start and stop tracking the worker.
Start tracking when the worker starts working and stop when worker stops working. The start and end of work is usually determined by login/logout, clock in/out, working hours, work assignment/completion and similar workflows. If this is determined from the backend, it is advisable to also provide the worker a way to manually clock in and out from the app as a fallback.
The Workers API gives you the power to reliably control tracking on worker devices from the backend. This requires a completed SDK setup with quiet push notifications. Review the respective Install SDK instructions to complete the setup. This is automatically set up in case you are using the HyperTrack Visits app.
Call Workers API with the worker's worker_handle and set tracking to TRUE to start tracking.
In order to protect the privacy of workers using your app, you are strongly encouraged to stop tracking when the worker stops working. This will positively impact your tracking rate because workers will trust the system and not try to kill tracking in the app through the smartphone or OS.
Call Workers API with the worker's worker_handle and set tracking to FALSE to stop tracking.
4. Using Geofence Visits
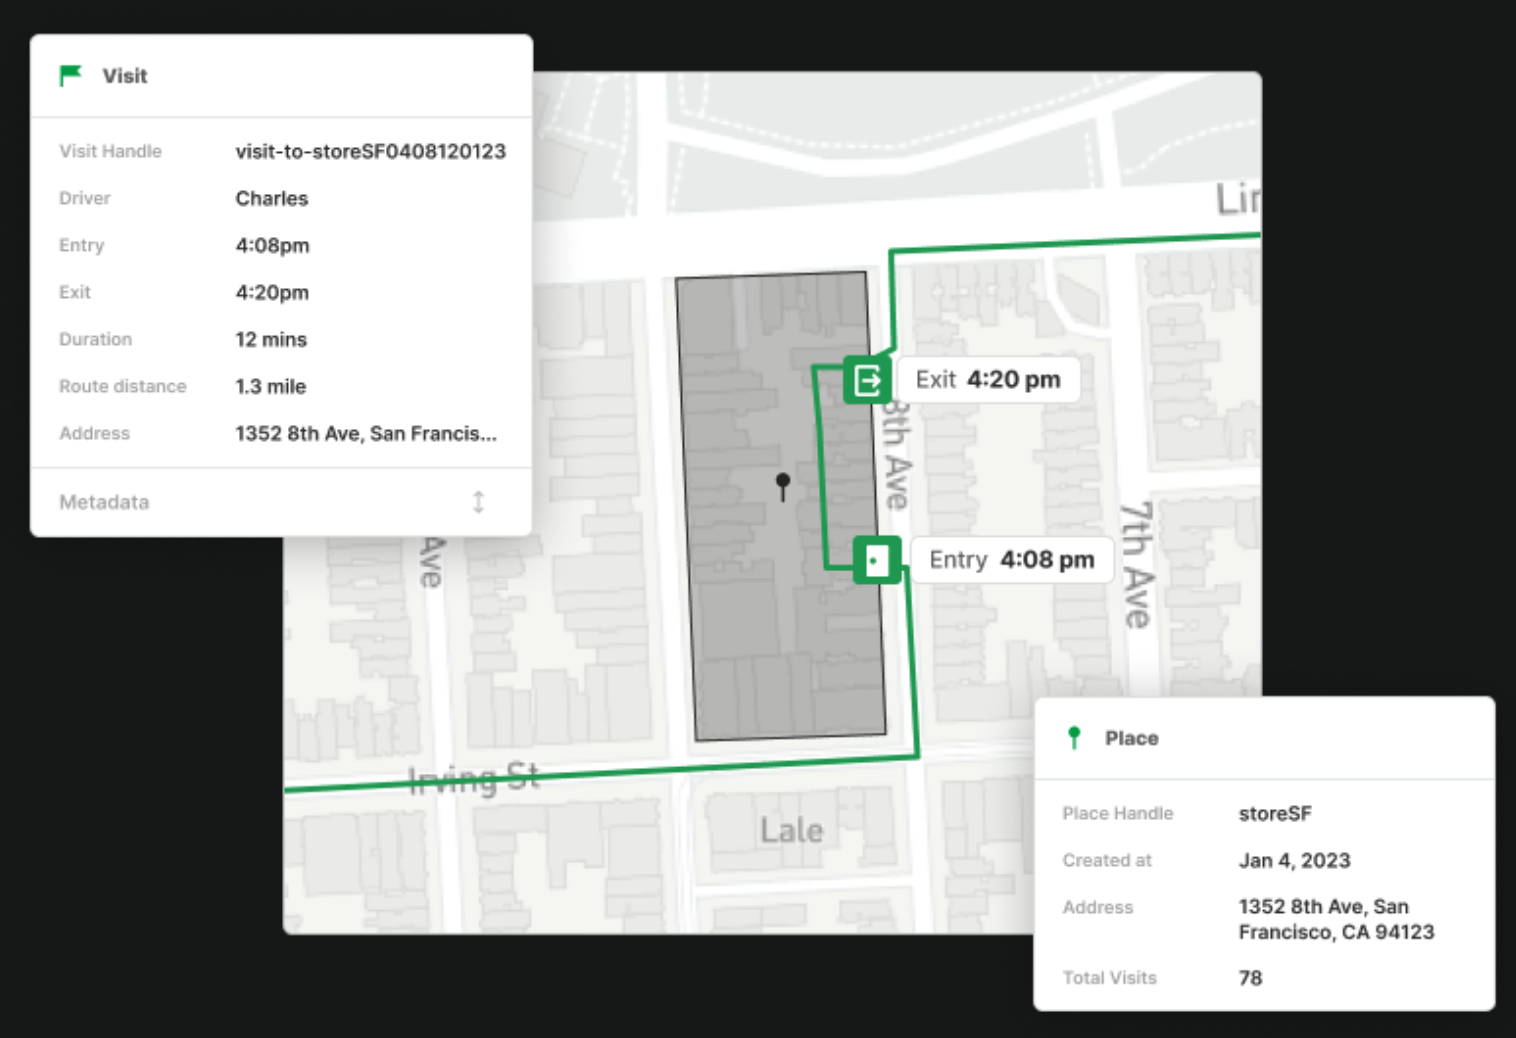
As workers visit places, HyperTrack generates visit markers that include information about the visit, the route to the visit, and the idle time (stops) before getting there. The visit marker is created upon arrival inside the geofence radius or geofence coordinates, and updated with visit information upon exit. The next section covers how you can receive geofence arrivals and exits over webhooks, query recent visits to the geofence, and add metadata to a visit marker.
Inside each visit, you will find arrival and exit objects that get created and updated upon arrival and exit respectively. Each visit is tagged with a unique marker_id so that you can differentiate them from each other.
When your workers arrive at a geofence, an object called route_to will be initialized if there was a previous geofence that they came from. Inside the route_to object you'll find attributes duration and distance that give metrics on how long and how far the journey was. Please note that a geofence will be initialized with a route_to object even if the previous geofence has not been exited.
Note that exits can happen when:
- Worker leaves the geofence. In this case, webhook payloads will have a location or
- Outages (like permission denied; location services killed, etc.; or when order completed). In this case the webhook payloads do not have a location
After your workers leaves the geofence, the marker will be updated with its own duration attribute for how they spent inside.
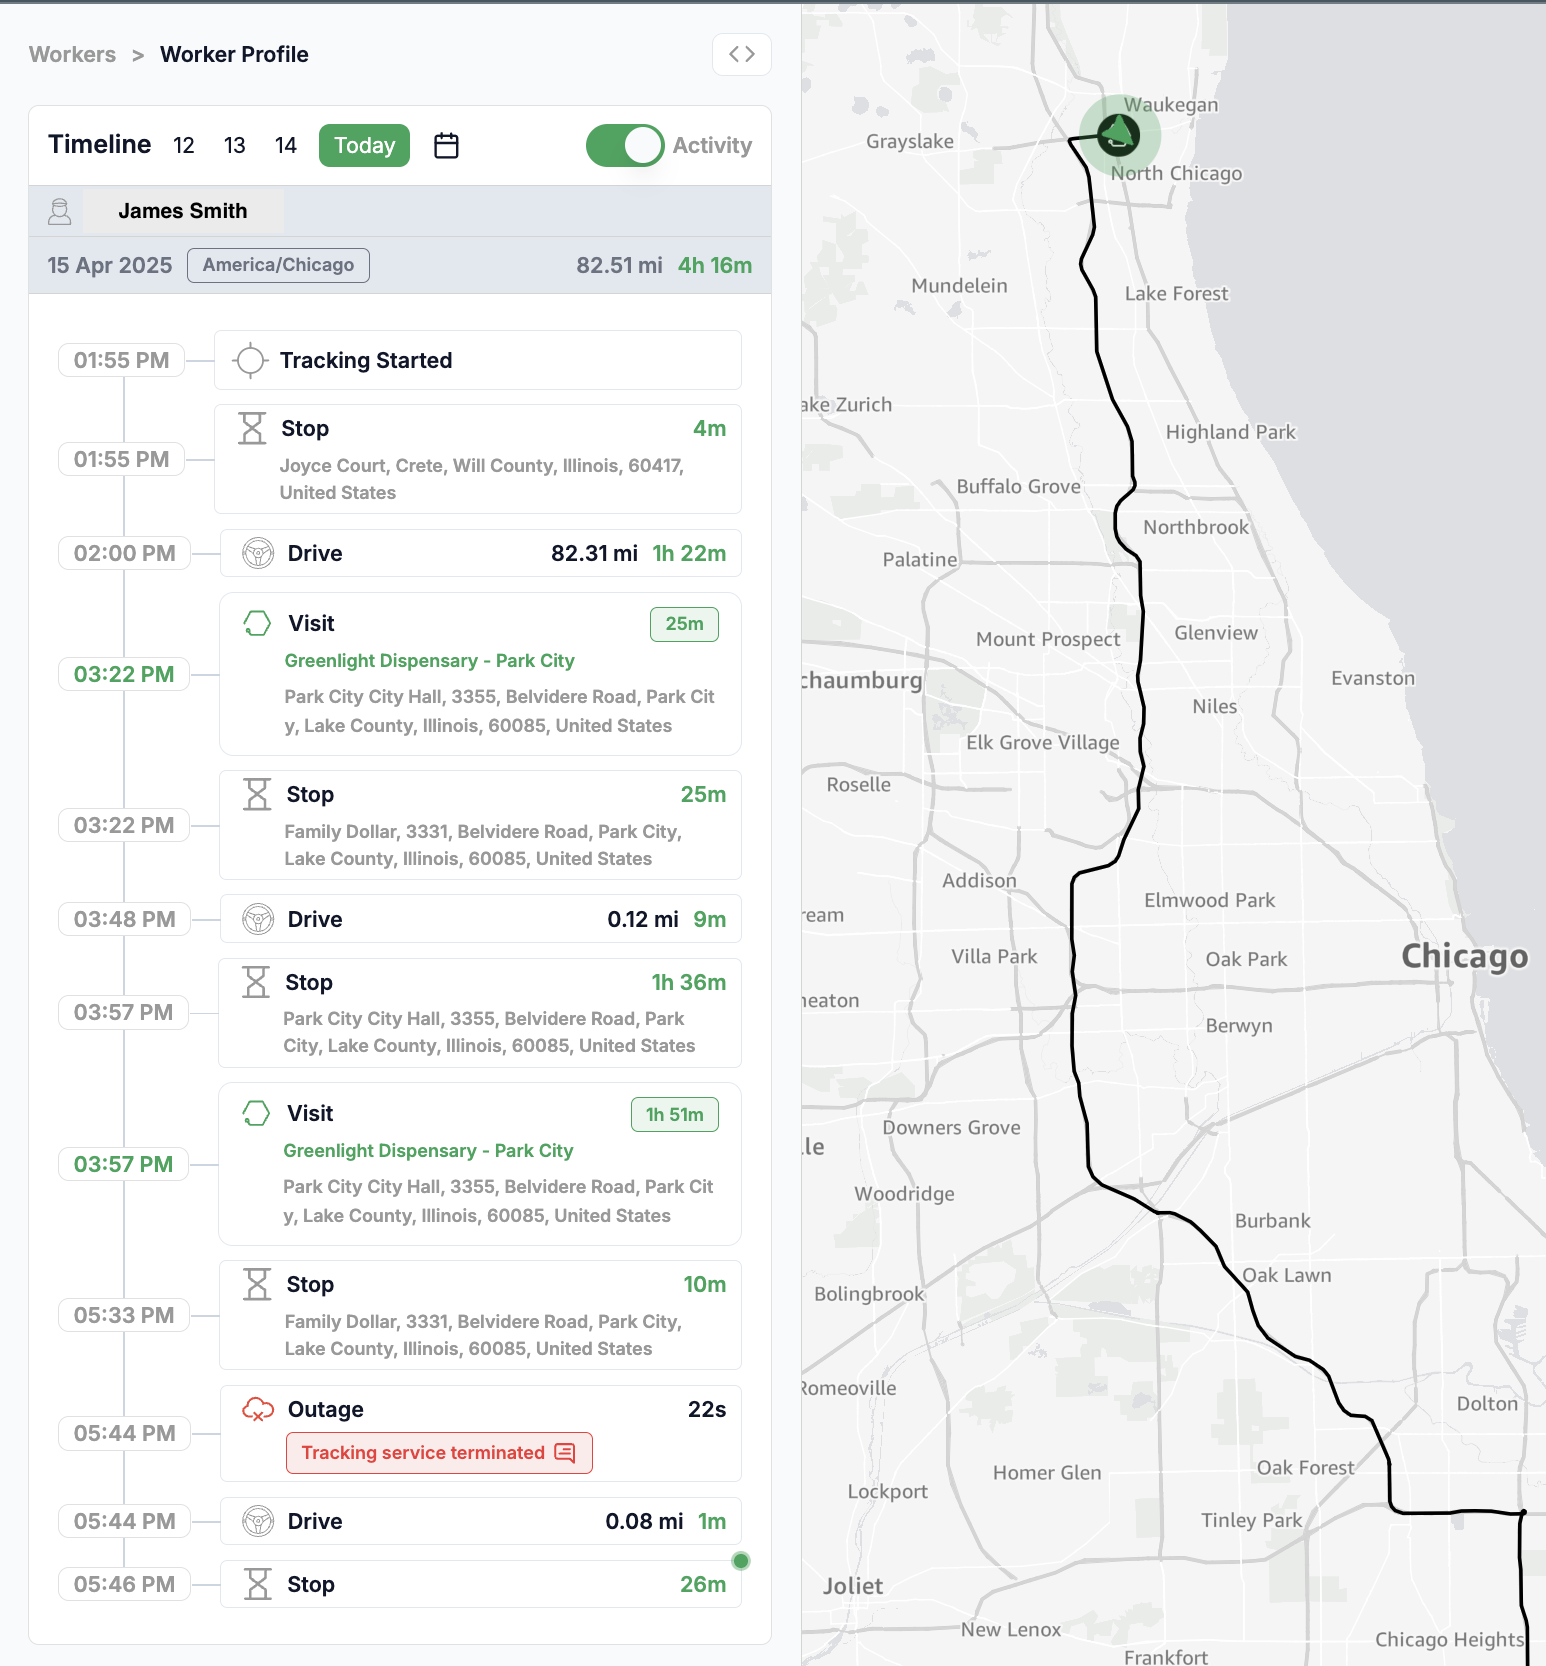
View timeline with visits
Get arrival and exit webhooks
By subscribing to geofence webhooks, you can receive a real-time stream of your worker's geofence arrivals and exits. This helps automate workflows such as attendance, time sheets, customer notifications, app notifications, exception handling, and more.
The webhook payload has the following data structure to represent geofence arrivals and exits. Note that the webhook payload can contain multiple entries, each with type geofence. Each geofence marker payload inside a webhook has a data object containing an arrival or exit corresponding to the state of the geofence. arrival will be shown by default, as a visit starts when a device enters a geofence. exit will be included when the worker leaves that geofence.
[
  {
    "device_id": "F3DF6D4F-6A06-4883-8201-D767EA408030",
    "data": {
      "geofence_id": "00001111-4047-4b28-a6ec-f934e870c425",
      "marker_id": "00001111-3767-2c12-f4ad-e213c130b321",
      "driver_handle": "worker-01",
      "place_handle": "place-01",
      "metadata": null,
      "geofence_metadata": {
        "station": "A"
      },
      "geometry": {
        "type": "Point",
        "coordinates": [
          -122.395223,
          37.7947633
        ]
      },
      "radius": 50,
      "arrival": {
        "location": {
          "type": "Point",
          "coordinates": [
            -122.394223,
            37.792763
          ]
        },
        "recorded_at": "2019-07-01T13:45:00.000000Z"
      },
      "exit": {},
      "duration": null,
      "route_to": {
        "duration": 3600,
        "distance": 2374
      },
      "value": "entry"
    },
    "location": {
      "type": "Point",
      "coordinates": [
        -122.394223,
        37.792763
      ]
    },
    "recorded_at": "2019-07-01T13:45:00.000000Z",
    "created_at": "2019-07-01T13:46:00.000000Z",
    "version": "2.0.0",
    "type": "geofence"
  }
]
The
valueattribute in thedataobject is a legacy field and contains some inconsistent terminology to what is currently given in the response. The value ofentrycorresponds to thearrivalobject. The value ofexitis unchanged and corresponds to itsexit.
Get Visits from API
Visits for a place can be retrieved using the GET Visits API. The API provides powerful filters for geofence_id, place_handle, worker_handle and much more. This helps dissect the Visits by different slices that can be used to update your system or deeper analysis.
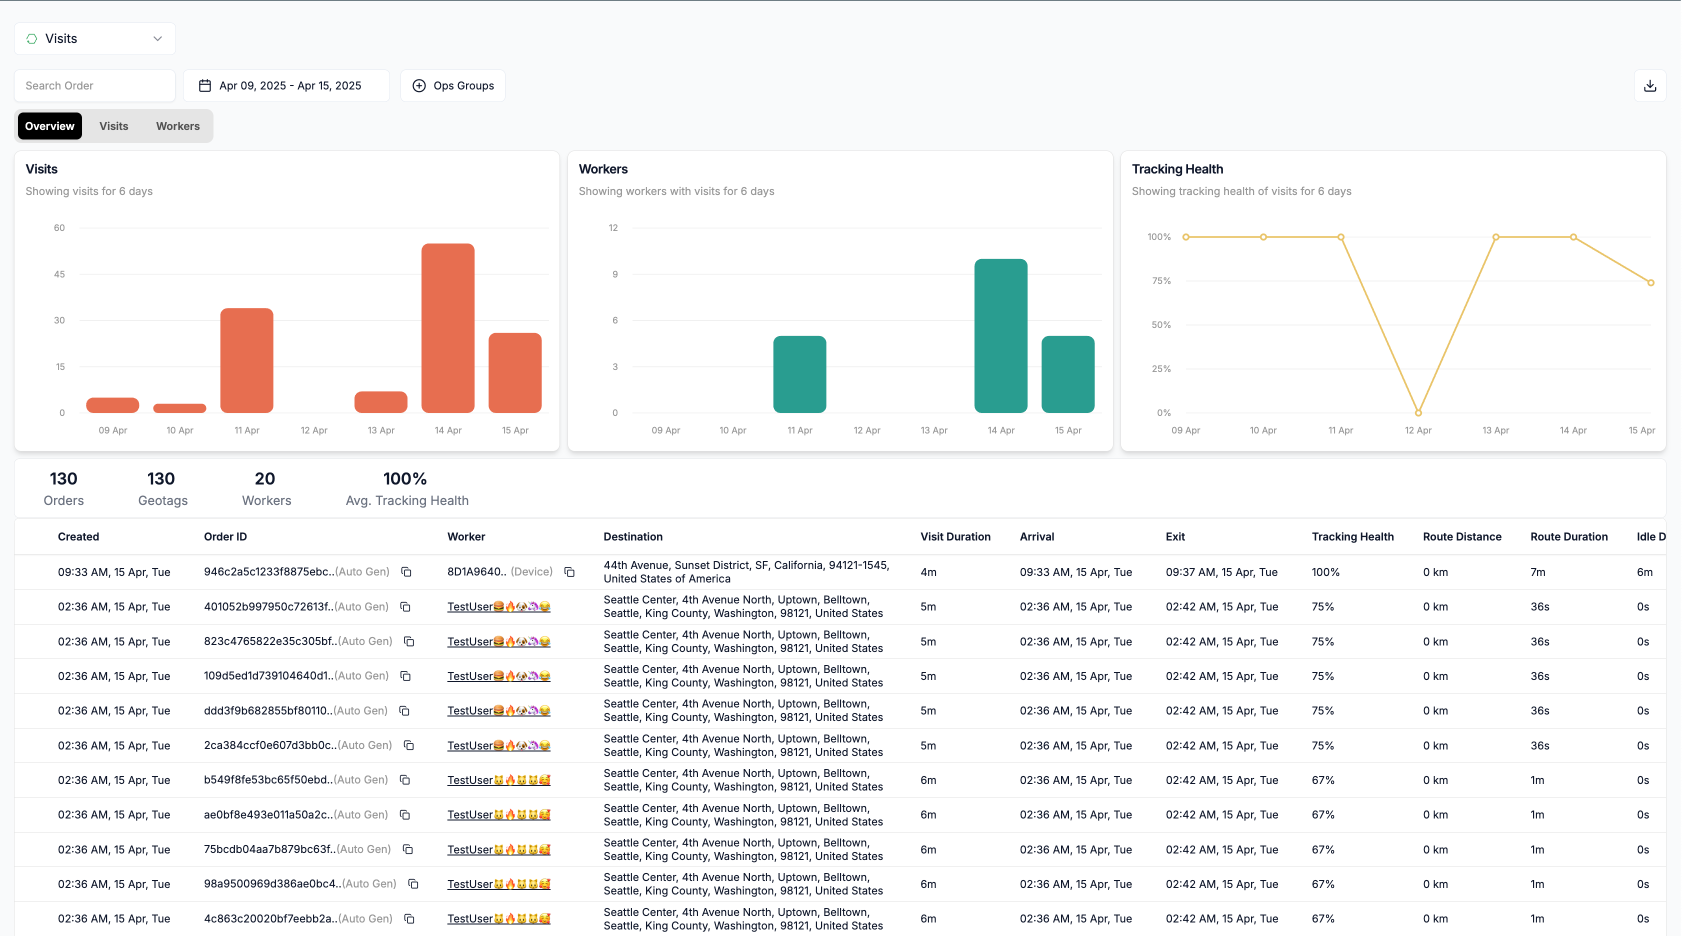
5. Visit Ops View
The Visits Ops View is the control tower for your Ops teams to understand what visits are taking place on the field. The rich charts provide important KPIs that indicate the work being done by workers along with the quality of visibility. The list provides all the metrics automatically computed for a visit that can then be used for timesheets and payouts. This view can be embedded in your own dashboards.
6. Update Visit Metadata
Visit metadata represents the outcome of the visit and helps measure productivity. Visit duration, route and idle time may be correlated with outcomes scores from your application. This information shows up in views and becomes available as filters.
To change visit metadata, it is important to store the visit marker IDs in your system. Use the Places PATCH API to modify visit metadata at any time.
PATCH
https://v3.api.hypertrack.com/visits/{visit_id}
payload='{
  "metadata": {
    "message": "Package left at the door",
    "tracking_id": "384748984"
  }
}'

curl -X PATCH \
  -u {AccountId}:{SecretKey} \
  https://v3.api.hypertrack.com/visits/{visit_id}
  -H 'Content-Type: application/json' \
  -d $payload
Blogs
Updated 7 months ago